There could be any number of reasons why you may need to take snapshots of what is on your MacBook screen. You may want to share the visual captures on your screen with someone else, or your reasons may be personal.
Whatever the situation, learning the keyboard shortcuts that can facilitate this with just a couple of touches will come in very handy. Taking screenshots on the Mac has never been a very complicated process.
Since the release of the macOS Mojave, the Mac now comes with a native screenshot tool and this makes things even easier for you.
There are different ways that you can take a screenshot on your Mac. The methods depend on what portions of your screen you want to capture.
Follow along for a simple guide on how to go about it. In addition, I will show you how to save and work with the screenshots after you have taken them.
The Screenshot App
In 2018, a new screenshot tool was introduced for the Mac, which came along with the macOS Mojave. The tool can be initiated by pressing and holding the COMMAND, SHIFT, and 5 keys together. Alternatively, you can navigate to Launchpad > Other > Screenshot.
This action calls up different options that allow you to take a screenshot of your entire Mac screen, a portion of the screen, or a window or menu.
Screenshot of the Entire Screen
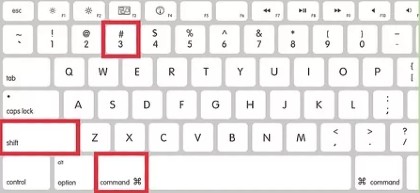
To take a screenshot of your entire Mac desktop, press and hold down the COMMAND, the SHIFT, and the 3 keys.
You will see a small thumbnail in the corner of the screen. To edit the screenshot you have just taken of your screen immediately, click on the screenshot thumbnail. Alternatively, you can wait for it to get saved to your desktop.
Screenshot of a Portion of the Screen
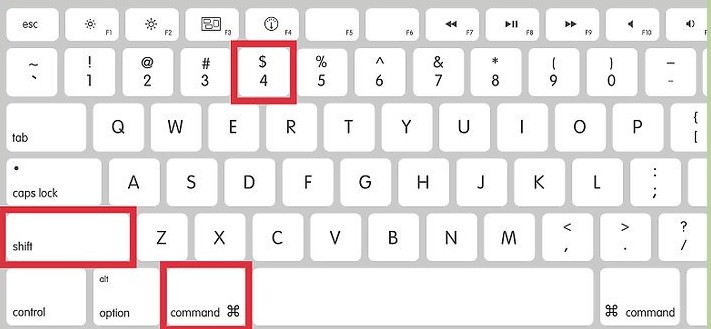
On the other hand, you may only want to capture a portion of your screen. Here, press and hold down the COMMAND key, the SHIFT key, and the 4 key.
This will turn the Cursor on your screen into a crosshair. You can now drag the crosshair to select the portion of your Mac screen you want to screenshot. To cancel the screenshot, tap on the Escape (Esc) key. When you release the mouse button or trackpad, the screen capture will be taken.
Again, you can click on the thumbnail that appears in the corner of the screen to edit the image or wait till it gets saved.
Screenshot of a Window on your Mac
A third method of taking a screenshot on your Mac involves capturing a single window or menu. In this case, make sure the window or menu you want to capture is open. Next, press and hold down the COMMAND key, SHIFT key, the 5 key, and the Spacebar.
The cursor will change to a camera icon. You may decide to cancel the screenshot if you chose to, by pressing the Escape (Esc) key. If you did not, click on the window or the menu you want to capture.
To avoid adding the window’s shadow to the screenshot, ensure you press and hold the Option key when you click the window.
Screenshot of the Touch Bar

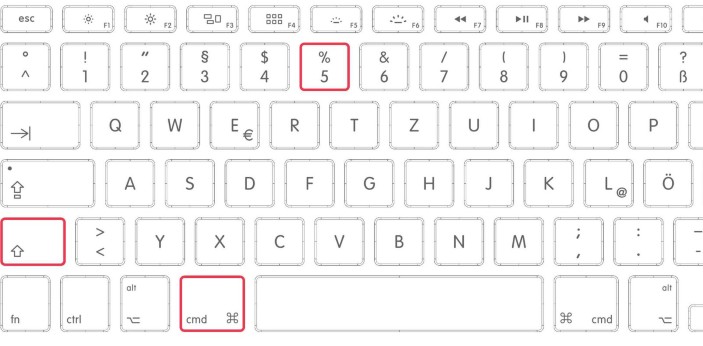
If you own a MacBook Pro or a device with the Touch Bar, you may decide to take a screenshot of the Touch Bar. To do this, press and hold the COMMAND key, SHIFT key, and the 6 key at the same time.
Take a Screenshot with Preview
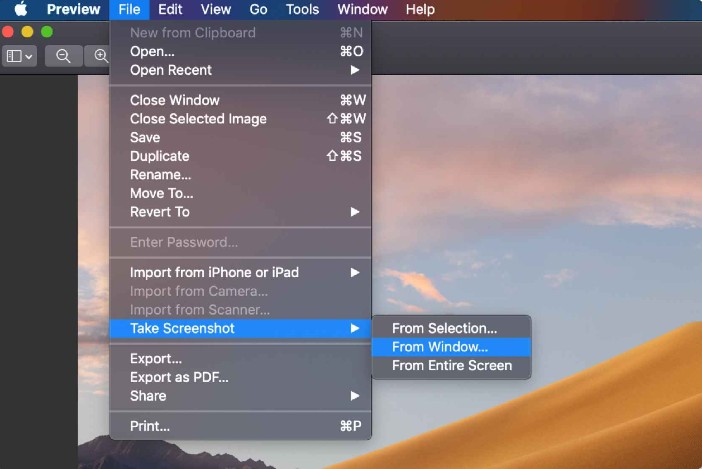
It is possible to take a screenshot on the Mac without using any of the keyboard combos.
- Open the Preview app, and click on the File dropdown menu.
- Click on Take Screen Shot and select one of the options that dropdown.
How to Change Where your Mac Screenshots Are Saved
The screenshots you take on your Mac are always saved to your desktop by default. To change the storage directory, open the screenshot tool (COMMAND+SHIFT+5). Next, click on the “Save to” sub-menu to select a new storage location from the options presented. If you prefer one not on the list, click on Other Location to select.
For more useful tips, be sure to browse our Guides section.